A detailed guide to implementing ecommerce tracking in Google Tag Manager
All businesses selling products online should be data driven. Knowing how, when and why your website visitors convert (complete a booking) into paid customers should be the foundation of your digital operations.
In a previous article we explained how you are able to implement visitor tracking in your booking pages in the same way as you might already be doing so in your website and linking the two domains so that a visitor on your website will continue to be tracked when being directed into your Anytime booking pages.
This guide should help you to implement basic ecommerce tracking to help get you started. What this article will not cover is more advanced tracking such as Google Ads or Facebook tracking, this would need to be implemented by a specialist agency such as a digital marketing agency and is not within Anytime Booking's understanding.
Some background
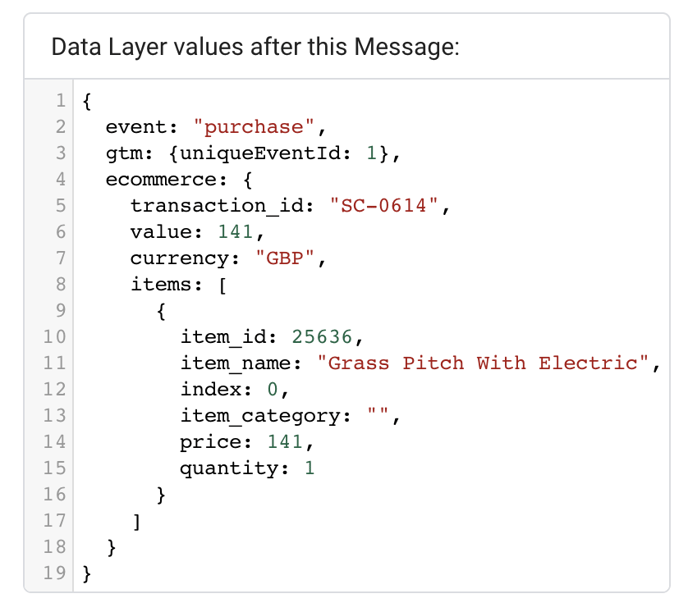
Once you have added your Google Tag Manager (GTM) container id to your booking pages (see previous article), then the process of enabling ecommerce tracking is simply to create a 'tag' in your GTM interface which identifies that you are wanting to track purchases made and a 'trigger' to tell GTM when to run the code that picks up the booking data from the booking completion page. When a booking is made our booking code adds the booking data into an object (known as a datalayer) in the source code as shown below. Data such as the transaction id, the total revenue, the unit type are all included.

The GTM tag should then be set to trigger or 'fire' when this data has been set, the moment the booking has been completed.
Create the Tag
In your GTM account click on Tags. If you already have GA visitor tracking in place then it's likely you will have a Tag set up that looks like this:
You will need this in place before continuing.
Then, click on the link or button to create a new tag:
Next create a tag of the type "Google Analytics: GA4 Event and then use the following to populate the fields, Your measurement Id can be found in your Google Analytics account. The event name must be set to "purchase'.
Then create a trigger which will fire when the booking is created as shown below.
The two ways to test your Tag!
The next part is to test it, as it has not as yet been published.
Simple version
The first method is to go to a test page that Anytime has created that has the datalayer built into it with some pre-populated test booking data. Go to the following url:
https://xyzsite.anytimebooking.eu/place_booking/googleTagManagerTest/
You will need to replace 'xyzsite' with the part of your account url that you normally use to log into your backoffice.
You should see this appear.
Next head over into your Google Analytics (GA) account into reports and then into your realtime dashboard. In the events panel you should see a purchase event appear.

This is from Anytime's GA account so it is showing more purchase events than you might see!
The technical version
This is a little more involved but it will help you to see what is actually being added to the datalayer specifically for your account.
From your dashboard click the preview button.

The Tag Assistant should appear
You now need to provide a url that essentially mimics a booking being made. In this case you can use the same booking complete url that one of your customers would have seen when they made their booking previously with you. Here is an example url from a booking made on one of Anytime's test accounts:
https://staging-vue.anytimebooking.eu/place_booking/complete/3349720
You will need to construct your url using your own account url followed by /place_booking/complete/ followed by the unique id of the booking. To obtain this booking id go into your Manage Bookings page in your back office and select a booking. Please contact support to get the booking id for a past booking. In time we plan to show the booking id in the header of the booking summary.
Please note: Obviously the past booking must be a online booking that has originated from your website, tracking will not work with any other booking type.
Insert this url into the field shown and click connect. GTM will now open a couple of windows. One of the windows will run the url that you have entered, where you should see the completed booking (this is just a simulation and not an actual booking!)
The other window will show a summary of which tags have fired and which have not including a huge amount of useful but technical information. This might be one for your developer or digital marketeer!

In this case you can see that our tag 'Google Analytics: GA4 Booking Complete' has fired and should have delivered the metrics to GA. Again in this case go back to your realtime events panel in GA and check to see if the purchase event has been made.
After a few hours you should begin to see conversion data beginning to appear in the Monetisation tab in GA.
Remember to publish your changes from your GTM dashboard when you are happy that data is being recorded in GA.
As mentioned this is intended to be a general guide to get you started. We always advise that if you need assistance on more in depth GTM/GA set up that you seek a Digital Marketing agency to help with this.
