How to configure your unit settings
The Parent Unit is the single rentable item like a property, apartment, chalet, motorhome or pitch. The Parent Unit will have all the occupancy, description, thumbnails, booking rules and details assigned to it.
The Sub Unit sits below the Parent Unit to help you quickly create multiples of the same thing. The Sub Unit is controlled by the settings on the Parent Unit. Sub Units are often used by campsites where they have a grass pitch named as the Parent Unit, and then Sub Units (No.s 1-100) underneath it.
Go to Configuration > Structure > Units > Select the Category > Select the Unit > keep ‘Parent Units’ displayed to add a new Parent Unit.

To create a new Unit, press New Unit (1). To make a change to an existing unit, double-click on the bar to enter (2).

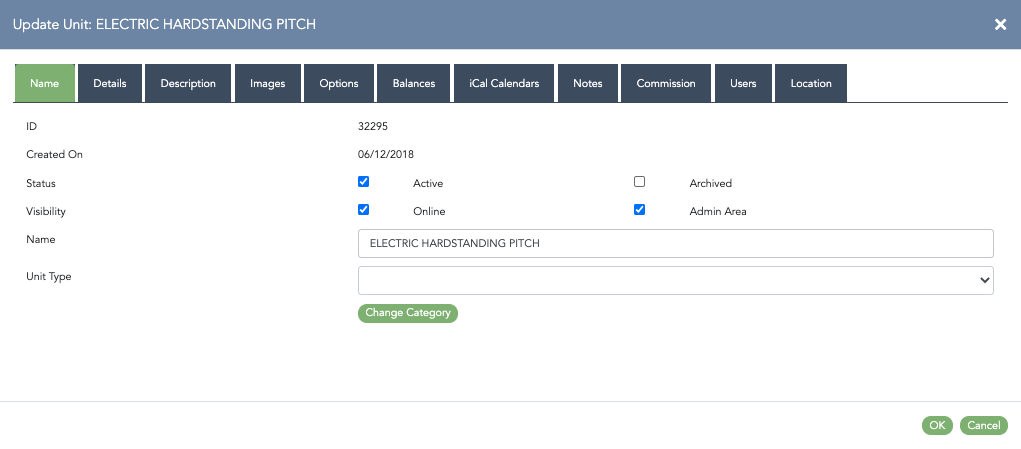 'Name' tab
This is where you can name your Unit. You can make the Unit active or inactive. You can also make it visible to the public online (front end) or just visible to you in the admin area (back end).
Note: If you tick 'Online' the Unit will display to the public. If you only have 'Admin Area' ticked, then only you can make bookings on the unit.
The Unit Type is where you can indicate what it is you are selling. This isn't displayed anywhere for the guest on the front end, it's just for your reference.
Naming your Unit
Once you have created your Unit and named it, save by hitting OK bottom right and then go on to populate all your rules into the other tabs.
Tips for naming your units:
If you are setting up cottages or unique glamping accommodation, give them individual names at this point (see below).

If you're setting up camping pitches or a series of glamping units or static caravans that are under the same type with the same rules for each one, you should now name your pitch, under which you can have a series of Sub-Units (so you don’t then have to create a unit for each pitch individually).
Typical unit types for camping would be Grass Pitch, Pitch with Electric and Hardstanding. Statics might be named Willow 2-bed, and glamping units might be Bell Tents or Pods (under which you can set up 10 Sub-Units if there were all the same, for instance).
Example showing with Sub-Units underneath:

Tip: if you see a red circle with a cross in the unit bar (as above) this means there are as yet no bookings against it and you can delete it if you need to. Once the unit has a booking history, the red circle disappears and also the option to delete the unit.
If you need to make changes once you have bookings on a unit, please talk to us at Anytime.
Details tab
The various rules applicable to your Unit are controlled from this tab.

The main rules to set here are the minimum and maximum occupancy levels for your unit here and the numbers of party members inclusive in the price.
To set your occupancy levels click on the dropdown tab next to each setting and choose the number. Note that you can set a different maximum occupancy online to the one for admin area. This means that while you can show a max occupancy number online to the customer (front end) you have some leeway behind the scenes and set it for more occupants. eg. if you set it to one more in the admin area, you can squeeze in an extra guest on a z-bed, on request. You can also set the number of bedrooms and bathrooms or en-suites your unit has, if applicable.
Under the Details tab you can also set the Party Members Inclusive In Price against the unit. This is often used by campsite owners where they want to sell a pitch and include two people in the base cost. Any additional people over the two set at base cost can be charged using the Party Members section of the admin area so the system knows to add a price for any additional party members booked onto the pitch.
Further Details Web Address – if you’re planning to have a search widget on your website to bring back content and pictures when your guests search for a stay then this provides a further link in the search results to more information for the property or unit (see below). Insert the URL of the full property/pitch details here.
Anything you put in Pet Friendly and Bedroom Descriptions will similarly also appear in your search results.

Description tab
Whatever you type in here shows on the search results. Try to keep your descriptions short and succinct.

Images tab
This is the image shown in the search results. Your images should be no more than 4920px by 3264px (16MP). Click on the white space, select your picture, open it and the picture will download here.
Note: Let us know if you want to upload more than one thumbnail as you can display up to four images but typically we only show one.

Options tab

Availability Type (1)
By default, every unit is at Standard Availability (On or Off).
You also have the option to use the Unit as: Occupancy Availability (Reduce by Party Size): in this mode the system will charge by Party Member rather than Base Cost and the Unit will take bookings until it reaches the set number of people (most often used in the Bunkhouse/Hostel scenario). If the guest wants to book the entire Unit it will charge the Unit pricing instead.
Booking Availability (Reduce by Each Booking): in this setting bookings can be placed until they reach a set number.
Note: Both the above settings are of optimum use to campsites that have an open field as opposed to designated pitches for their guests.
Time Availability: used where the Unit can be booked out by the time from 15 mins upwards, rather than as a 24 hour slot.
See ‘how to create a time-based activity’ article.
Default Availability Level.
Set this number if Occupancy or Booking Availability was the availability choice i.e if you have a field that takes up to 100 guests, choose Occupancy Availability and set this level to 100.
Take Enquiries Only (2)
With this feature enabled your guest will only be able to make an enquiry, not book online, ideal if you decide to vet people that want to stay before confirming a booking. The information given by the guest will show up under the Enquiries button on the left hand menu.
Multi-Plot Functionality (3)
You will need to contact us to enable this feature fully and then choose which Category and Units you wish to include by tickling this box. Multi-Plot Functionality makes the Unit whatever the guest is bringing - large axle caravan/campervan/small tent - and will only show suitable pitches available. Great for defining pitches that can accommodate only certain sized vehicles or only tents.
Automatically Cancel Provisional Bookings (4)
Set this to automatically cancel your Provisonal bookings after a set amount of time if the customer has not made a payment. These bookings will still show under 'cancelled bookings'.
Define Cut-off Period (5)
By default, the system will allow the online customer to book 48 hours in advance. If you tick Define Cut off Period you can determine how soon before their arrival date they can book using the dropdown Cut Off Period. If you select Book Today it means your customer could turn up straight after making the booking.
Hide Sub Units (6)
This limits the pitch options for your guests by hiding the specific Sub Units from them at the time of booking. But also allows you to move your guests to whichever pitch you like after the system has automatically placed them.
Restrict Sub Unit (7)
Here you can control whether the customer is able to choose their Sub Unit if their length of stay is a certain number of nights. i.e over 7 nights stay. If under the set number of nights the system automatically allocates the next available pitch. Ticking this box enables a new dropdown option in the Rates section called 'Nights Sub Unit Pick List'. Once this setting is ticked under Units, you need to go to the Rates section to complete the controller.

Following the example above 7 nights on this option gives the online customer the ability to choose their pitch for a week’s stay or more, and leaves you able to move around bookings less than 7 nights.
Show Pitch Size (8)
Enabling this will display the Unit name (and size) on the pick-list in the booking process. The size is stored and pulled across from the Options tab under the individual Sub-Unit (as below).

Show Pitch Occupancy (9)
Once selected this will show the occupancy level on the Sub-unit in the booking process. Like Pitch Size, this is controlled at the Sub-unit level under the Details tab (as below).

Not Chargeable (Hide Payment Gateway) (10)
If you do not want people to pay for this unit using the Payment Gateway assigned to your account, you can switch it off by ticking this. This allows you to accept free bookings, if it’s an event, for example.
Auto Confirm (11).
Use this function so that you don't need to confirm every online booking as it comes in. The system will automatically confirm the bookings and they won't show on the Dashboard as Provisional.
The next three options are search widget related:
Hide Category & Unit (Booking Process After Widget).
Ticking this box means that you can hide the category and unit in the rest of the booking process to prevent the customer changing their minds about which unit they are booking.
Hide Visual Calendar (Booking Process After Widget).
Ticking this box means that you can hide the availability calendar in the rest of the booking process to prevent the customer changing their minds about which dates they are booking.
Hide Length Of Stay (Booking Process After Widget).
Ticking this box means that you can hide the length of stay in the rest of the booking process to prevent the customer changing their minds about how long they are booking for. They can only book what they originally choose on the widget.
Balances Tab

Use this if you take a Deposit payment to set the rules for when Balance payments are due.
Enable Balance Reminder is activated by ticking the box if you want the email to go out automatically a certain time period before the guest’s arrival. If you want your Deposit to be paid at least 14 days before arrival, set the Balance Payable (Days Before Arrival) to 14. This triggers the Balance Overdue email to go out if the customer hasn’t paid the balance on their booking.
The Balance Reminder Email (Days Before Arrival) triggers the Balance Reminder email. Typically you would set the reminder email to fire out a week before the balance is due. If for some reason you don't want this to happen automatically, you can push these emails out manually instead under the Email Status & Email Log tab within the booking (as below).

iCal Calendars Tab
Please check with the support team support@anytimebooking.co.uk if you wish to enable iCal sharing.
Notes Tab
This is a free field area where you can input your own notes relating to the unit.
Commission & Location Tabs
These functions are for our cottage/self-catering property customers.
You can add in a default commission for each property, as well as an address of the property which will pull through to the emails using the 'Unit Postal Address' token.