![email-signature-anytime-logo-1.png]](https://knowledgebase.anytimebooking.co.uk/hs-fs/hubfs/email-signature-anytime-logo-1.png?height=42&name=email-signature-anytime-logo-1.png)
It uses the fundamental elements of the existing Rates page, with improvements to make managing rates quicker and more straightforward.
From this area, you can view, add, edit, copy, import, export and publish rates, as well as see notifications and prompts to help identify potential issues with your rates.
1. Accessing the Rates tab
From the left-hand navigation menu, select Rates.
The Dashboard tab will open by default. To view and manage your rates, select the Rates tab.
2. Selecting the unit and year
At the top of the Rates page, you can select:
- Category– Select the category you want to manage.
- Unit – Select the specific unit you want to view or update.
- Year – Select the year you want to work with.
- Table / Calendar – Switch between the Table and Calendar views.
The Table view provides a detailed view of your rate bands and is useful for making changes to individual rates. The Calendar is a future feature. 
3. Managing your rates
The action buttons at the top of the page provide quick access to the main rate management functions:
- Add rate – Create a new rate band.
- Copy rates – Copy existing rates to another period.
- Import rates – Import rates into Anytime.
- Export rates – Export your rates from Anytime.
Also we have added the ability to view & edit pricing as a Nightly or Total price, use the toggle as displayed in the screenshot below.
Further guidance will be provided separately for adding and editing rates and copying rates.

4. Understanding the Rates table
The Rates table displays the key information for each rate band.
Active= Use the toggle to turn a rate band on or off.
From / To= Shows the date range that the rate band applies to.
Nightly rate= Displays the price charged per night for the rate band.
Min nights / LOS= The same field is used to display either the minimum number of nights (Min) and Length of Stay (LOS).
An indicator is displayed next to the field to help you identify which setting is being applied:
- Min – Minimum number of nights required for the booking.
- LOS – Length of Stay rate.(only used where different rates required for specific lengths of stay in the same date band)
Arrival / Departure days = Select which days guests can arrive and depart.
Note= Add an internal note to help provide additional information.
Online / Admin= Shows where the rate is being used, such as Online, Admin, or both.
Edit / Delete= Use the available icons to edit or delete an existing rate band.

5. Rate notifications and prompts
The Rates page will highlight potential issues to help you keep your rates complete and accurate.
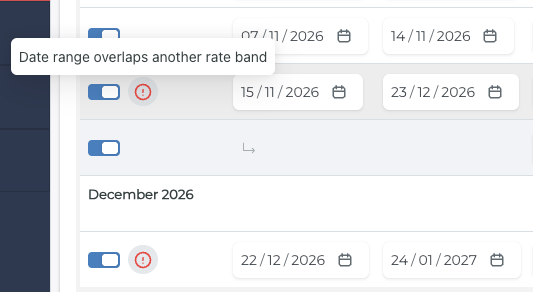
Rate overlaps-
If two rate bands overlap, a notification will be displayed to highlight the issue.
This allows you to identify and resolve overlapping rate periods before they cause problems with your pricing.
Missing rate periods-
If Anytime detects a gap where there is no rate covering a period, you will see a prompt within the Rates table.
For example:
No rate band for 01/07/26 – 30/12/26?
You can select + Add rate next to the notification to quickly create a rate for the missing period.
Understanding Minimum Stay and LOS Bands
We’ve had a few questions about how Minimum Stay and LOS (Length of Stay) bands work, so here’s a quick explanation.
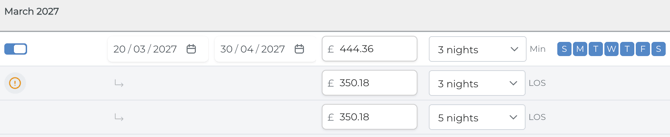
In the example shown, the main rate band has a Minimum Stay of 3 nights, while the following LOS band has a Duration of 3 nights.
It’s important to understand that these are two separate settings:
- The first/main band will have a Duration of 1. This follows the same setup as the old rates system.
- The Minimum Stay determines the minimum number of nights a guest must book.
- The 3-night LOS band is the rate that will be used when a guest books exactly 3 nights.
So, in this example, the main band defines the starting rate and minimum stay, while the 3-night LOS band provides the specific price to use when the booking is for 3 nights.
6. Publishing rates
Once you have made changes to your rates, the Publish button at the bottom right of the page will indicate how many items are waiting to be published.
For example, if the button displays Publish 1, there is one unit waiting to be published.
Select Publish to publish your outstanding rate changes.
Once published, the number shown on the button will update to reflect any remaining items that still need to be published.