Checkout configuration overview
If you are moving from our PlaceBooking form to our Checkout form for the first time you will notice that the Site Setup in your Configuration will be different:

Only when you switch your Checkout live, will the Guest Booking Form & Account Area will be hidden.
Guest Checkout
Please note that each section of the configuration includes tooltips (indicated by a ? icon) to guide you through how and where each of the settings is used.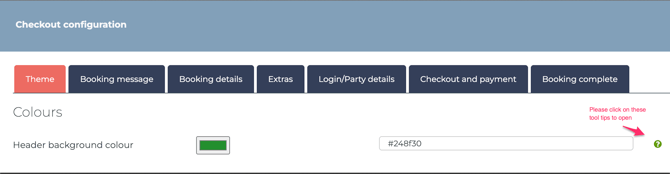
Customising your checkout theme
Within this section, you can personalise the look and feel of your checkout page:
-
Checkout colours – choose colours using the picker, or enter a HEX colour code (e.g.,
#1A73E8) to match your website branding. -
Fonts – select a font from our Google Fonts dropdown list.
-
Logo – this logo is linked to your account. Updating it here will also update the logo in the Your Account area.
Customising checkout labels
You can rename the labels for each of the different sections of the booking form. Available tabs include:
-
Booking Details
-
Extras
-
Log-in/Party Details
-
Checkout and Payment
-
Booking Complete
Remember to click Save Changes at the bottom of each tab when you finish.
To test your changes, use the Preview Booking Form button. This will open a new browser tab and let you walk through the booking journey.
Additional configuration options
1. Property image display
-
-
If you’ve uploaded any property images in Unit Settings (Configuration → Units → Update Unit → Images), the first image will appear in the booking summary.
-
2. Town and County display
-
-
You can choose to show or hide the Town/City and County on the booking form summary (see image below).
-
To manage this, go to Configuration → Units → Update Unit → Location. Enter details if you want them displayed, or leave them blank to hide.
-

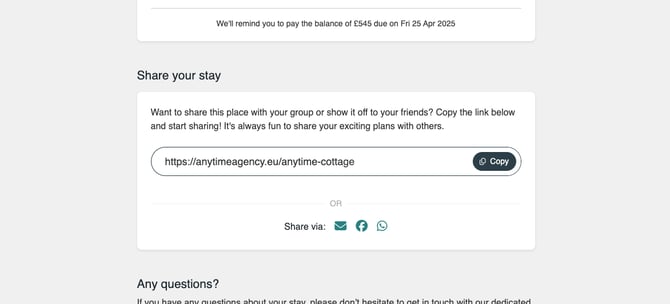
3. Share your stay
-
On the new Booking Complete page (after payment is taken), guests can share details of the property they are going to be staying in using a link they can copy.
-
If you don’t want to display this option, simply leave the link field blank.
-
To set it up, go to Configuration → Units → Update Unit → Details tab, and enter a URL in the 'Further Details Web Address (Search Widget)' field.
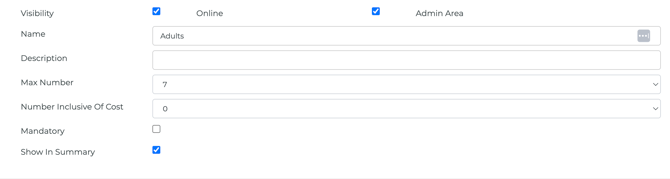
4. Party Members
- Make sure you set your max number of adults/children/infants under Configuration → Party Members so this reflects in the checkout.
Tip: Always preview your changes before going live to ensure the checkout experience matches your branding.
Please take the time to watch this handy checkout configuration video to help you change the look and feel of the booking form to match your business: