![email-signature-anytime-logo-1.png]](https://knowledgebase.anytimebooking.co.uk/hs-fs/hubfs/email-signature-anytime-logo-1.png?height=42&name=email-signature-anytime-logo-1.png)
This guide explains how to connect your Booking.com property to Anytime Booking.
There are two parts to the setup:
-
Authorising Channex as your connectivity provider within Booking.com.
-
Creating your Booking.com connection and mapping your rooms and rates within Anytime Booking.
Before you start
You will need:
- Access to your Booking.com Extranet with administrator permissions.
- Access to your Anytime Booking account.
- Your Booking.com Hotel ID.
- Understand your Booking.com room and rate plan configuration.
- Add any length of stay/ promotions to Booking.com - we are only able to send the base rate and minimum stay on arrival days.
We recommend completing the Booking.com authorisation yourself, as Booking.com may require two-step verification.
Important: We are only able to map your primary rate band and your min stay, your length of stay pricing will need to be set up directly in Booking.com.
Part 1 – Authorise Channex in Booking.com
Before connecting through Anytime Booking, you need to give Channex permission to manage your Booking.com property, this is our third party connector name.
Step 1 – Log in to Booking.com
Log in to your Booking.com Extranet.
Once logged in, locate your Hotel ID. This is displayed near the top of the navigation area, alongside your hotel/property name.
Make a note of this name and number, as you will need it later.
Step 2 – Select your connectivity provider
-
Navigate to Account (click your profile icon in the top right).
-
Select Connectivity Provider.
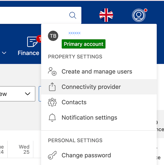
- Click Search to find a connectivity provider.
- Enter Channex in the search field.
-
Select Channex.io from the results.
-
Review the provider information and click Next.
Make sure you enter the full word Channex when searching.
Step 3 – Accept the XML Service Agreement
Booking.com will display the XML Service Agreement.
- Read through the agreement.
- Tick the checkbox to confirm that you accept the terms and conditions.
- Click Yes, I accept to continue.
Once accepted, your connectivity provider request will be submitted.
Your Booking.com property may initially show a waiting status while the provider connection is being approved.
Important: You can continue with the mapping process in Anytime Booking while the request is waiting, but you will not be able to activate the connection until Booking.com has authorised Channex.
Part 2 – Create your Booking.com connection in Anytime Booking
Once you have submitted your connectivity provider request, you can start setting up the connection in Anytime Booking.
Step 4 – Open Anytime Connect
- Log in to your Anytime Booking account.
- Navigate to Anytime Connect in your Configuration.
- Choose Booking.com from the available channels.
Step 5 – Select your Anytime Booking units
Before configuring your Booking.com connection, you need to select which Anytime Booking units you want to connect. If you have your listings set up under different Hotel ID's you will need to select No — each unit needs its own Booking.com hotel ID and then follow the steps below.
OR
If you have multiple listings under 1 hotel id then select Yes — one hotel ID has multiple rooms or properties and we suggest using the name that is associated with the ID in Booking.com (This is displayed near the top of the navigation area, alongside your hotel/property name).
- Locate the units you want to connect to Booking.com.
- Select the relevant units.
- Click Add to Booking.com.
Only select units that you intend to make available through Booking.com.
Once you have added your units, head to the Configure Properties tab.
Step 6 – Configure your property (General settings)
In the Configure Properties tab, select an Integration group in the dropdown and click Create which appears below it. Then complete the following connection details per property:
- Channel: Select booking.com
- Title: Enter a name to help you identify this connection - we recommend the hotel/property name which is found next to your hotel id in Booking.com.
- Hotel ID: Enter your Booking.com Property ID, which you noted earlier.
Once you have completed the details, select Test Connection.
This checks that Anytime Booking can access your Booking.com property through Channex.
If the test is successful, you can continue to the mapping stage. If it fails, check that you have entered the correct Property ID.
Step 7 – Match your rooms and rate plans (Mapping)
You now need to map the rooms and Basic rate plan in Booking.com with the corresponding units and rate plan (Best Available) from Anytime Booking.
The mapping screen displays the Booking.com rooms and rate alongside the corresponding Anytime Booking mapping options.
Important: Make sure all rooms and rate plans that you intend to sell through Booking.com are mapped correctly. Unmapped rooms or rates can cause booking and synchronisation errors.
If you no longer use a room or rate plan in Booking.com, we recommend removing it from your Booking.com configuration rather than leaving it unmapped.
Identifying your Booking.com rooms
Booking.com may display its default room names rather than any customised names you have given your rooms.
Each room will also have a Room ID to help you identify it.
If you have multiple rooms with the same name, check the Room ID against your Booking.com Extranet to make sure you are mapping the correct room.
Step 8 - Uplift pricing to Booking.com (Channel Settings)
Click Add modifier to set up a percentage uplift to all rates sent or a fixed amount if required)
Click Save to send this information to Booking.com. Please allow a minute and check that the pricing looks correct in Booking.com.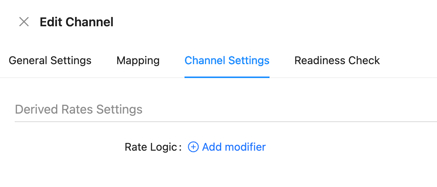
Part 4 – Activate your connection
Step 9 – Activate Booking.com
Once your mapping has been saved and Booking.com has approved Channex as your connectivity provider(you will receive an internal message in Booknig.com to confirm this), you can activate the connection.
- Locate your Booking.com connection in Anytime Connect.
- Open the connection's Actions menu.
- Select Activate.
Once activated, Anytime Booking will begin synchronising your information with Booking.com.
This includes:
- Availability: Available and unavailable dates are sent to Booking.com.
- Rate: Your mapped pricing is sent to Booking.com.
- Bookings: New bookings received through Booking.com are imported into Anytime Booking.
Part 5 – Import existing future bookings (if required)
If you are moving from another booking management system or setting up a new connection, you may need to import bookings that already exist in Booking.com.
Channex provides an option to retrieve future reservations from Booking.com.
Important: Imported future bookings may contain less information than bookings received through the normal live connection. In particular, the imported booking information may not include:
- Taxes and fees.
- Guest contact details, such as email address, telephone number and postal address.
- Commission information.
Importing existing bookings does not automatically update availability within Channex, so availability should be checked following the import.
Important information
Maintaining your mapping
If you add new rooms in Booking.com, make sure these are also mapped correctly within Anytime Booking.
Remember to un map any listings you no longer want connected, to stop any over bookings or charges.
If you need help completing your Booking.com connection or are unsure how to map your rooms and rates, please contact the Anytime Booking Support team.