Please Note: if your Anytime Booking account is not live do not send out any emails to your guests as these will be inaccurate.
For an overview, please see the video below
If you prefer a written guide please see below
Once logged into your Anytime Booking account select the 'New Booking' tab from the left hand menu bar.
1. Enter the Basic Booking Details:
Date the booking created - it defaults to today's date.
Booking Source - choose between telephone, email, walk-in or owner (if an agency)
Booking Agent - choose from dropdown, if applicable.
External Reference - OTA reference number.
Options - if you're inputting a booking for a past date.
2. Enter the Unit and Arrival information:
Select from the dropdown boxes:
- Category
- Unit
- Arrival Date
- Number of nights
Choose the Party Members
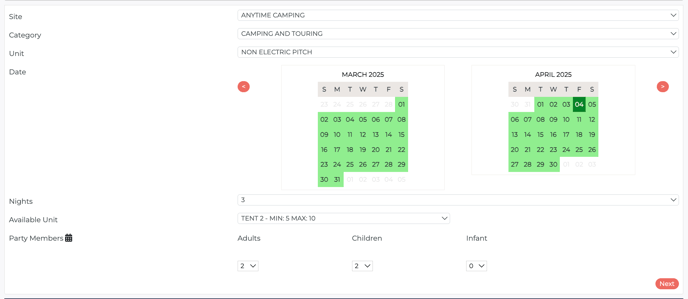
The information is populated on the right in the Booking Summary.
To amend any pricing, click on the costs.
If you would like us to enable VAT in your account please email support@anytimebooking.co.uk.

Once this section is completed, select the Next button.
3. Extras
Select Extras as required and this will automatically update the costings in the Booking Summary.

You can also use the 'New Extra' button to create your own custom extra for a specific booking.
4. Further Details
Here you need to select from the mandatory dropdown box for How Did You Hear About Us?
Then you have the option to add Notes for- Admin/In-House
- Customer (guests will see these notes)
- Housekeeper (agency module users only)
Add Discount Code, if applicable
Terms & Conditions - do not have to be read as an admin user

The next page will ask if you want to make another booking - this is only relevant if your guest is wanting to make more than one booking.

If you select 'Yes' you'll be taken to the start of the booking process to make your second booking for that customer, if you select 'No' you'll be taken to the Customer Details page.
5. Customer Details

Option 1
Search for the customer by entering their email address into the Find Customer box. If they've already stayed with you, their details will come up for you to select. This prevents more than one customer record being made for the same customer.
Option 2
Enter the customer details adding n/a to any sections that cannot be populated. Leave the email section blank if no customer email address is available.
Contact Permission - select Y or N
Select the Place Booking at the bottom of the Booking Summary.

Once you click on Place Booking you'll be asked if you would like to send out the following emails:

If you're adding in a new booking and you're a LIVE account we advise sending out these emails to maintain consistent communication with your guest.
6. Recording A Payment
If you select 'No' to making a payment the booking will be completed and marked as Provisional.
If you select 'Yes' you'll need to record the date of payment, method, amount and add a note if applicable.